Self-tanning: everything you need to know for an even glow
A beautiful, even tan instantly gives you a well-groomed look and a boost of confidence. But not everyone has the time, opportunity, or desire to sunbathe extensively. Self-tanning offers the perfect solution for this: a natural, golden glow without harmful UV radiation. By 2026, self-tanners will have become an integral part of the beauty routine of thousands of people. Whether you have a special occasion or simply want radiant skin all year round, with the right knowledge and products, you can effortlessly achieve that sunkissed result you crave.
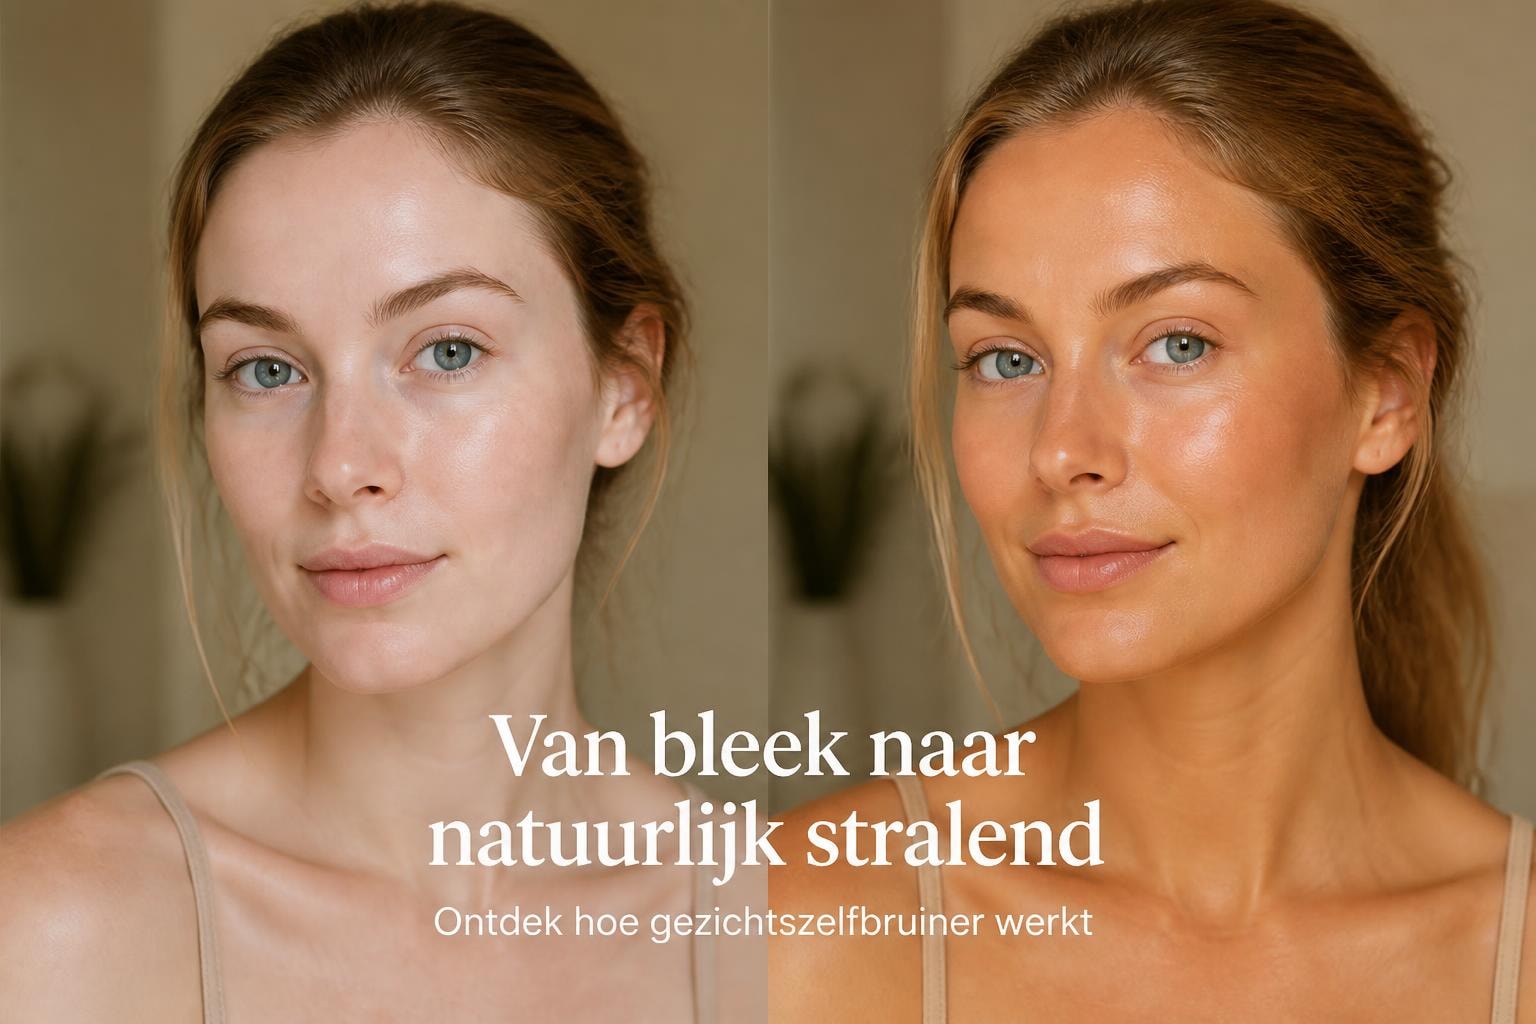
How does self-tanning actually work?
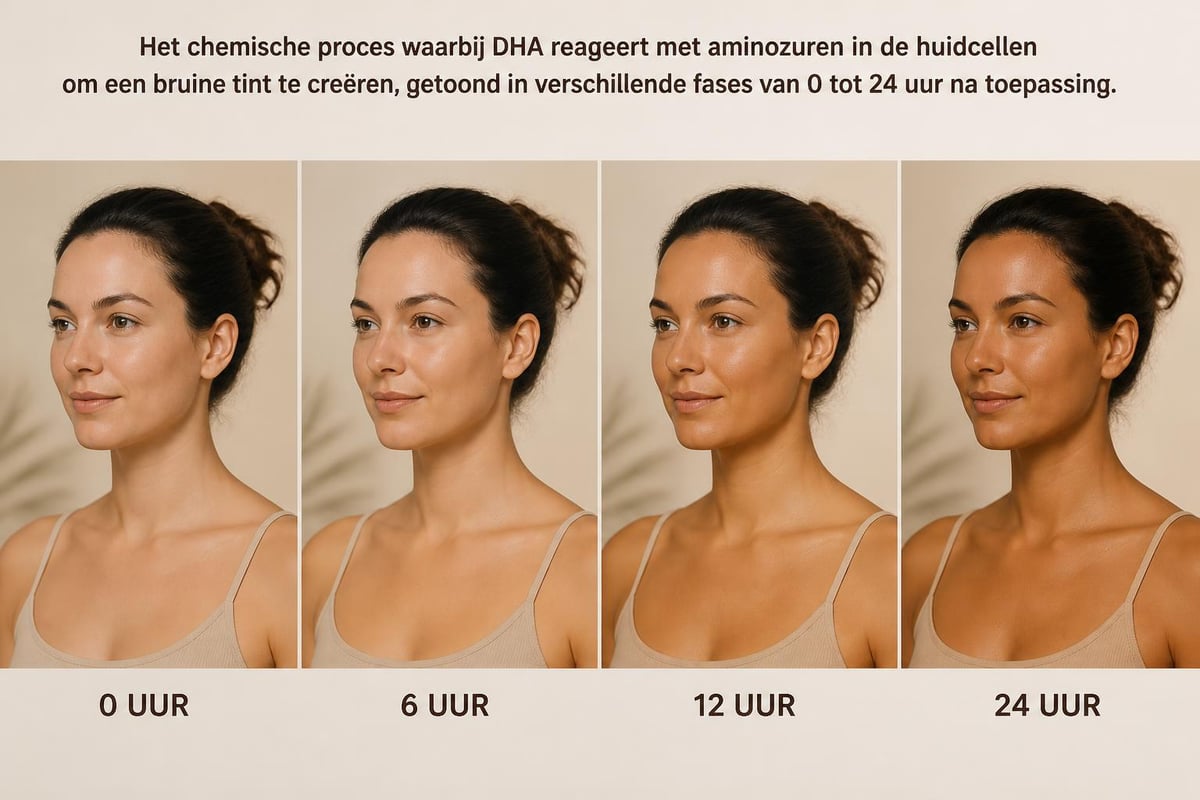
The magical brown color you get from self-tanning is not a coincidence. The active ingredient in most self-tanners is dihydroxyacetone, better known as DHA. This natural sugar reacts with the amino acids in the top layer of your skin, creating a temporary tan known as the Maillard reaction.
This process begins within hours of application and usually reaches its optimal color after 2 to 3 hours. The beauty of this method is that your skin is not exposed to harmful sun rays, making it a safe way to achieve a tan. Everything about self-tanners explains in detail how this scientific process works.
Different concentrations for different results
Self-tanning products contain varying DHA concentrations, typically between 2% and 10%. A lower percentage provides a subtle, light glow that is perfect for daily use. Higher concentrations result in a deeper, more summery tan that is noticeable after just one application.
DHA concentrations and their effect:
- 2-3% DHA: light glow, natural finish
- 4-6% DHA: medium tan, vacation look
- 7-10% DHA: deep tan, intensive result
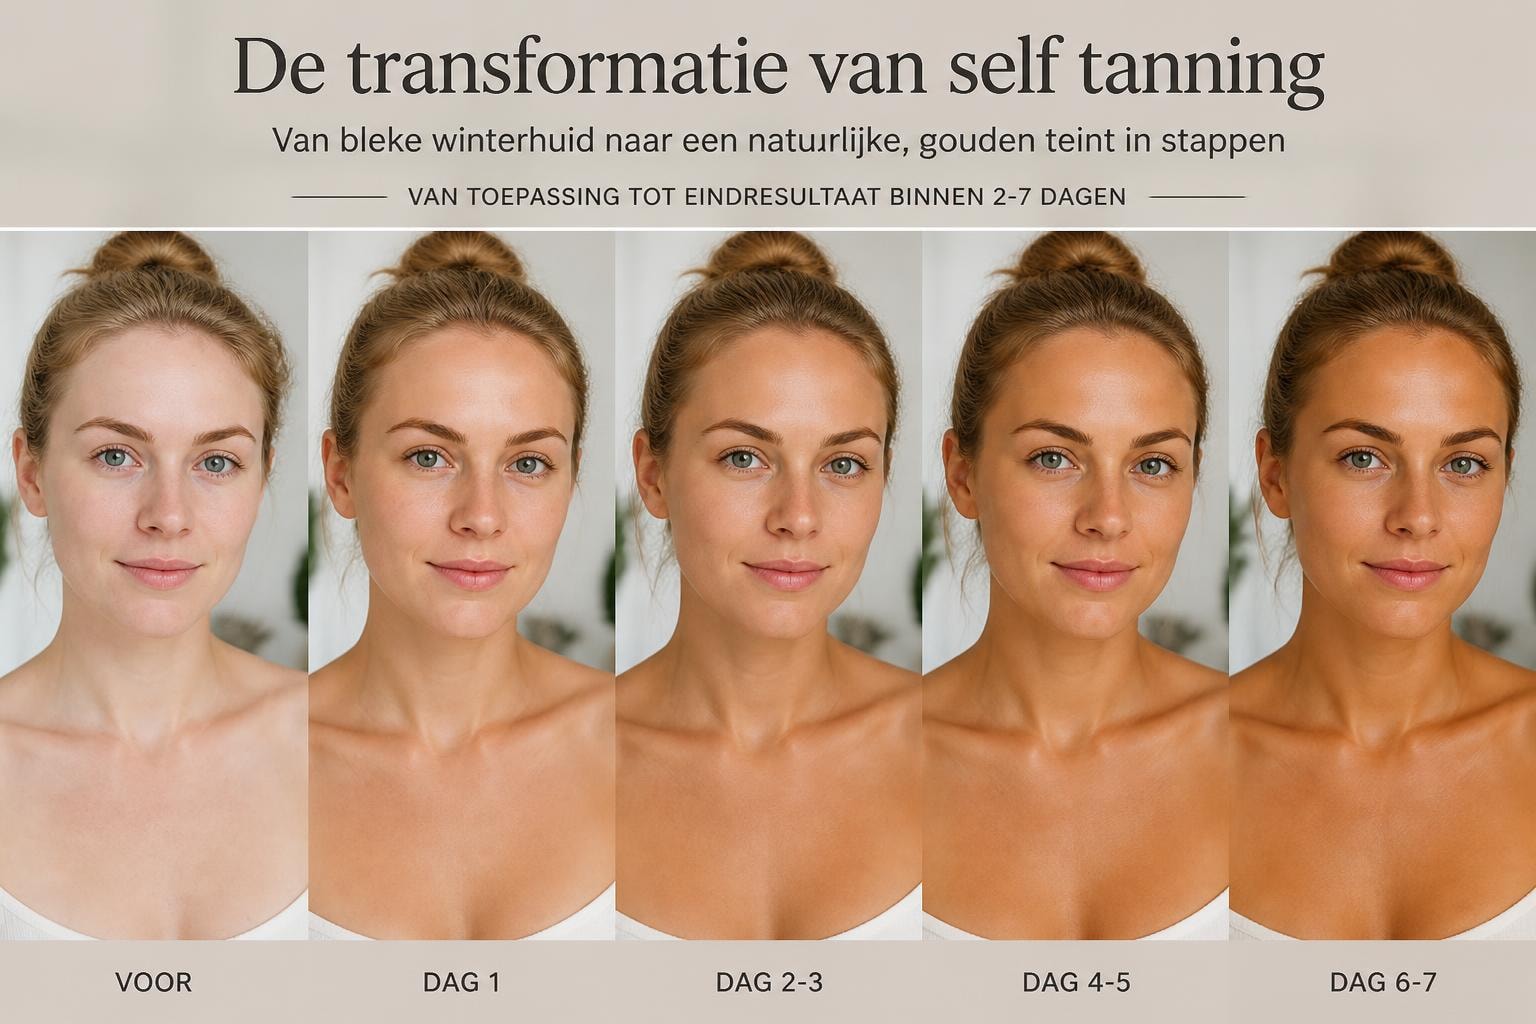
The color usually lasts 5 to 7 days because your skin is constantly renewing itself. The top layer of skin, where the tanning takes place, gradually sheds. By regularly exfoliating and moisturizing, you can prolong this process and keep the color beautifully even.
Preparation: the basis for a streak-free result
Perfect self-tanning doesn't start with applying the product, but with careful preparation. Your skin must be completely clean, smooth, and hydrated to absorb an even tan. This requires a thoughtful approach that you start at least 24 hours in advance.
Begin with a thorough exfoliation of your entire body. Remove dead skin cells with a scrub or exfoliating mitt, paying extra attention to rough areas such as elbows, knees, ankles, and feet. These areas absorb more product and can therefore become darker.
| Preparation Step | When | Why |
|---|---|---|
| Exfoliate | 24 hours before | Removes dead skin cells |
| Shave/remove hair | 24 hours before | Prevents irritation and clogged pores |
| Hydrate | Daily until 12 hours before | Ensures even absorption |
| Dry skin | Immediately before application | Prevents streaks due to moisture |
Critical areas that require extra attention
Certain body parts require special treatment when self-tanning. Your hands, feet, elbows, and knees have a thicker layer of skin that absorbs more product. Apply a thin layer of body lotion to these areas before you start self-tanning. This creates a barrier that prevents you from getting too dark in these spots.
Your face also requires a different approach. The skin here is more sensitive and delicate, so a special facial self-tanner or a lower concentration of DHA often works better. Avoid the hairline, eyebrows, and around your eyes, unless you deliberately want to tan these areas.
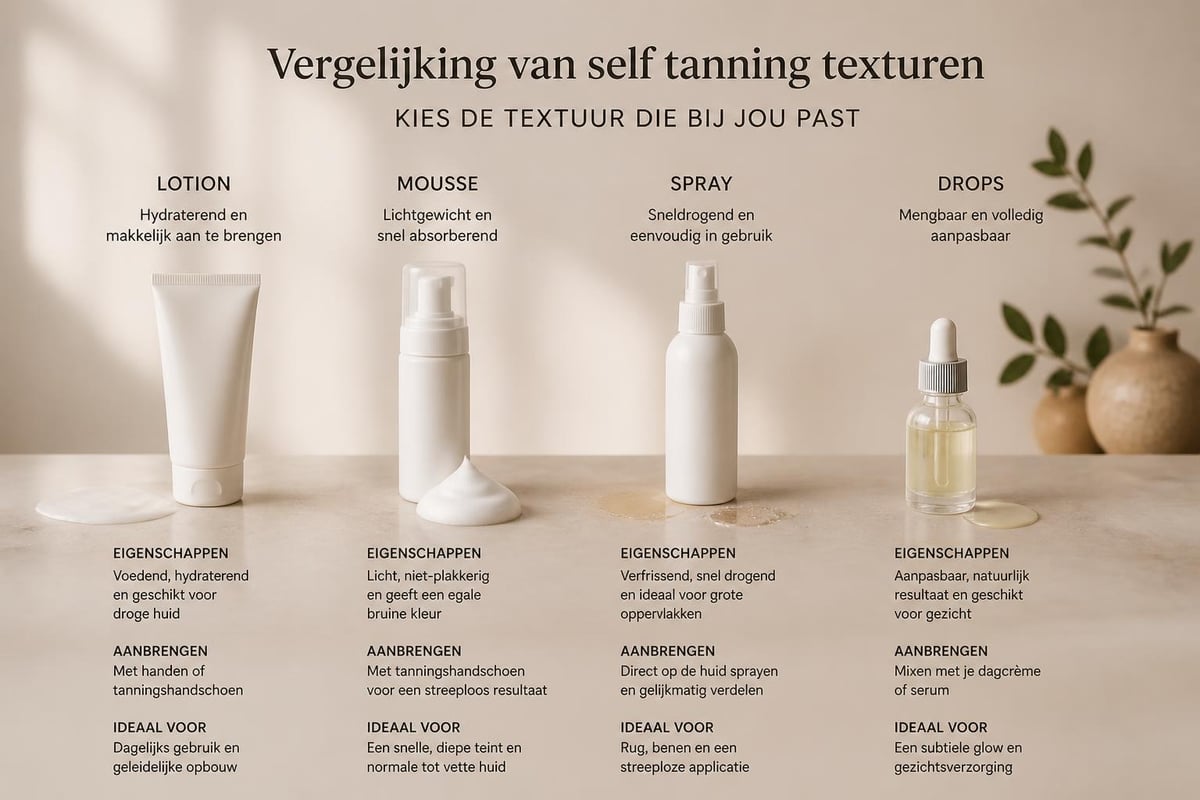
The different self-tanning formulas
Self-tanning comes in all sorts of forms and textures, each with its own advantages and disadvantages. The choice depends on your experience, the desired result, and your personal preference for application.
Lotions and creams are the most popular form of self-tanning. They offer control during application and are ideal for beginners. The texture makes it easy to see where you've already applied product, especially with tinted formulas. They absorb quickly and provide even coverage over large areas. At Tanning Glamour, you'll find natural lotions that become visible within 2-3 hours and last beautifully for up to a week.
Mousse versus spray: what suits you?
Mousse formulas are light and airy, allowing them to absorb extremely quickly. This makes them popular for those who have little time or self-tan in the evening before going to bed. The dry finish means you can put on clothes immediately without transfer. However, mousse requires a bit more experience to avoid streaks.
Spray self-tanning offers the fastest application of all. Perfect for your back and other hard-to-reach areas. Modern formulas provide a fine mist that is evenly distributed. Be mindful of your surroundings, as spray can get on furniture and floors. Work in the bathroom or lay down towels.
Tanning drops are the latest addition to the self-tanning family. You mix a few drops with your daily face cream or body lotion, allowing you to determine the intensity yourself. This offers the most flexibility and is perfect for gradually building a natural glow. The self-tanner drops collection shows how versatile this formula can be.
The perfect application method step-by-step
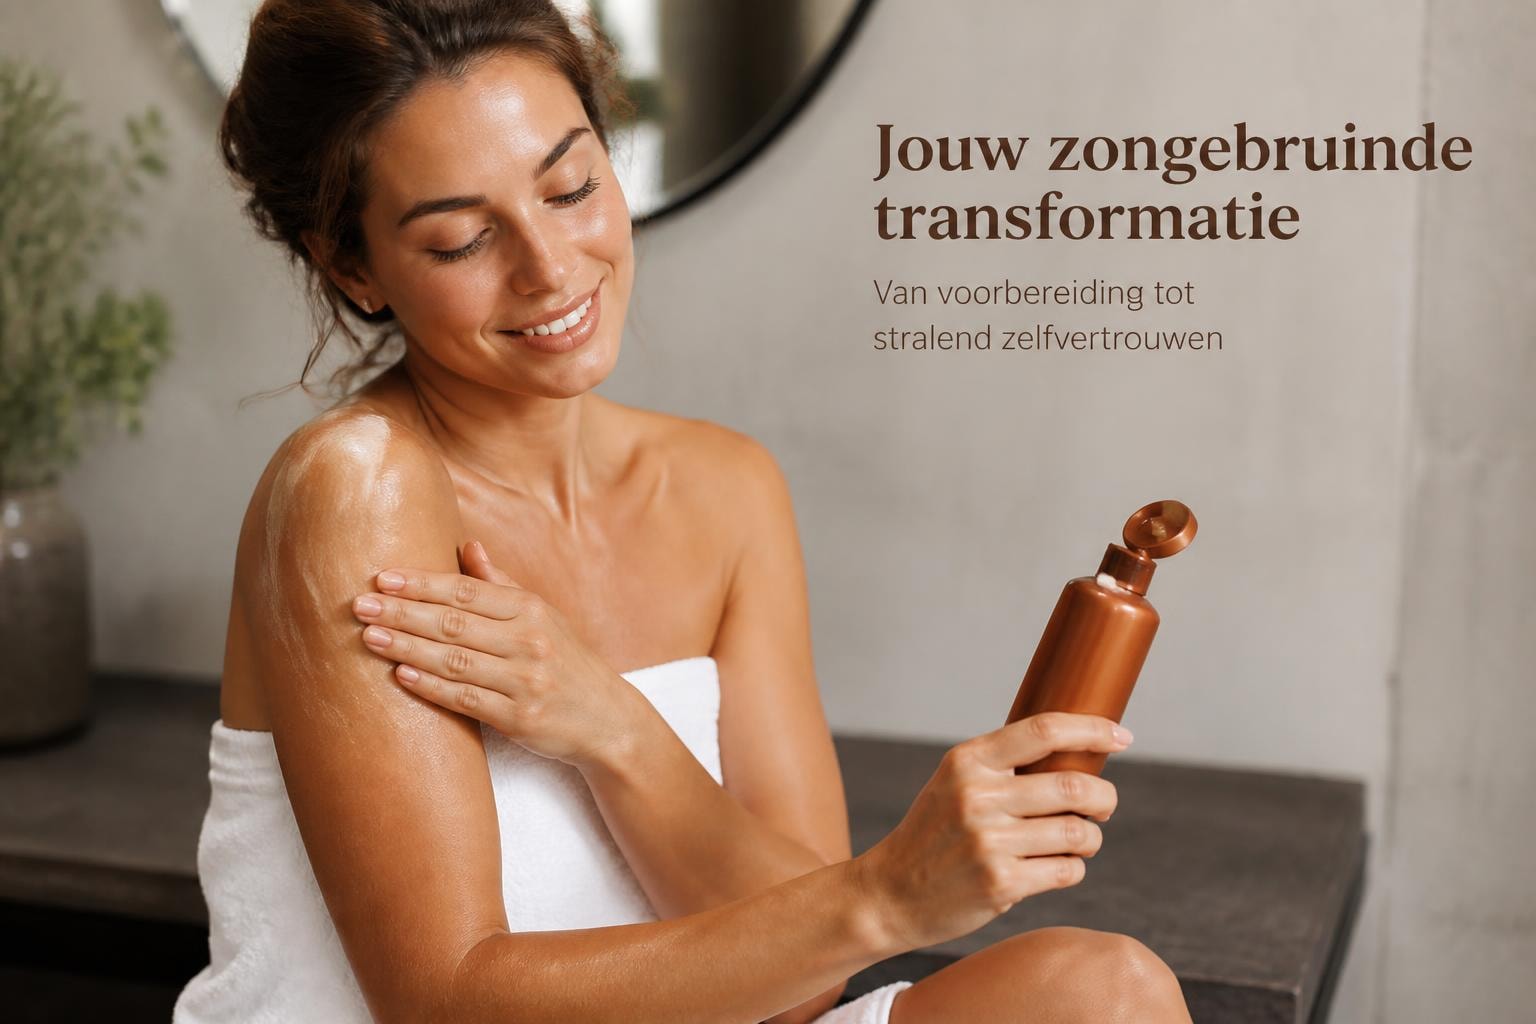
Applying self-tanning is an art that you quickly master with the right technique. Always start with clean, dry hands and make sure you have enough time without rushing. A calm moment ensures the best focus and the most beautiful result.
Start with your legs and work your way up your body. Apply the product in long, flowing motions that follow the natural lines of your body. Use circular motions on difficult areas such as knees and elbows. Work systematically so you don't miss any spots.
- Start at your ankles and work your way up your legs
- Treat your upper thighs with long, vertical movements
- Apply product to your stomach and back in circles
- Work your arms from wrist to shoulder
- Have someone else do your back or use a special applicator
- Do your face last with less product
A professional applicator mitt makes a huge difference in the final result. Your hands stay clean, the product is evenly distributed, and you prevent streaks. For a perfect, streak-free result, correct application is essential.
For hard-to-reach areas like your back, there's a handy solution. The Tanning Glamour back band makes it possible to apply an even layer independently without the help of others, making your routine much simpler.

Face and neck: the finer points
Your face requires a more subtle approach to self-tanning. Use less product than on your body and distribute it carefully over your entire face. Start in the middle and work outwards, paying extra attention to the transition to your neck and hairline.
Mix facial self-tanner with your day cream for a more natural result. This gives you more control and prevents certain areas from becoming too dark. Don't forget your ears, neck, and décolletage, so everything blends beautifully without harsh lines.
Common mistakes and how to avoid them
Even experienced self-tanning users sometimes make mistakes that affect the result. The good news? Every problem has a solution, and with the right knowledge, you can completely avoid these issues.
Streaks usually occur due to uneven application or working too quickly. Take your time and always use an applicator mitt for even distribution. If you do develop streaks, gently exfoliate with a soft scrub and reapply product to the lighter areas.
| Problem | Cause | Solution |
|---|---|---|
| Orange undertone | Incorrect DHA concentration | Choose product with ash/olive base |
| Spots | Too much product in one place | Dilute with lotion, gently exfoliate |
| Quick fading | Dry skin | Moisturize intensely daily |
| Dark knuckles | Product on hands | Wash immediately after application |
Timing and drying time: patience pays off
One of the biggest mistakes is moving too quickly or putting on clothes after applying self-tanner. Give the product at least 10 to 15 minutes to fully absorb before touching anything. Some formulas even require 20 minutes of drying time for optimal results.
Only shower after the development time, usually 4 to 8 hours after application. Showering earlier will wash away the DHA before it has fully reacted with your skin. Therefore, plan your self-tanning for the evening before bed, so the product can work all night. Wear loose, dark clothing to prevent transfer.
Maintaining self-tan for long-lasting results
A beautiful tan from self-tanning requires consistent maintenance. Your skin is constantly renewing itself, so without proper care, your glow will fade faster than desired. With a smart routine, you can keep your tan fresh and even.
Hydration is the absolute key to long-lasting self-tanning. Apply a rich body lotion daily, especially after showering. Hydrated skin renews more evenly, ensuring your tan stays beautifully even and doesn't fade patchily. The Voedingscentrum even investigates how nutrition influences the longevity of your tan.
Daily maintenance tips:
- Apply body lotion within 3 minutes of showering
- Use lukewarm instead of hot shower water
- Pat your skin dry instead of rubbing
- Lightly exfoliate every 3-4 days for even fading
- Drink plenty of water for internal skin hydration
Touching up and building your tan
For a constant glow, you can reapply self-tanner every 3 to 5 days. You don't have to wait until the color has completely disappeared. A light exfoliation removes the faded top layer, after which you apply fresh product for a seamless transition.
When building a deeper tan, it's better to apply multiple thin layers than one thick layer. Wait at least 24 hours between each layer so you can assess the result. This method provides more control and a more natural end result than using a high concentration immediately.
Self-tanning through the seasons
While self-tanning is usable all year round, each season requires a slightly adapted approach. In winter, when your skin is paler and drier due to heating, start with a lower DHA concentration. This prevents too much contrast and looks more natural.
During spring and summer, you can gradually build up to a deeper shade. Many people then combine self-tanning with limited sun exposure for an extra dimension. Note: self-tanning does NOT provide UV protection. Always use sunscreen when going outdoors.
In autumn, self-tanning is popular for holding onto the summer glow. Your vacation tan fades, but with regular application, you can retain that sunny feeling. Autumn is also a perfect time to experiment with new formulas, as any mishaps remain hidden under clothing.
Special occasions and event planning
For important events, self-tanning requires strategic planning. Always test a new formula at least a week in advance, not right before your big day. This way, you'll know how your skin reacts and what shade you'll get.
Plan your last self-tanning application 2 to 3 days before the event. This gives the color time to fully develop and settle. On the day itself, your tan will look its best: even, radiant, and natural. Avoid last-minute panic applications that can go wrong.
For photo shoots or video recordings, a slightly deeper tan can be advantageous, as cameras often register lighter. Consult professionals or test this in advance. A golden, even tan yields fantastic results in photos and boosts your confidence during the event.
Combining with other skincare products
Self-tanning fits perfectly into your existing skincare routine, provided you follow the correct order. Active ingredients such as retinol, AHAs, and BHAs can cause your skin to renew faster, making your self-tan fade more quickly. Use such products in moderation or adjust your tanning frequency.
Always apply self-tanner to clean skin without other products. Perfumes, oils, and even some moisturizers can interfere with the DHA reaction. Wait at least 8 hours after self-tanning before applying other products, except for a light, unscented lotion if your skin feels dry.
Product order for self-tanning:
- Cleanse your skin thoroughly
- Exfoliate (only on tanning day)
- Wait until skin is completely dry
- Apply self-tanner
- Allow to absorb completely (10-15 min)
- Normal skincare routine after 8+ hours
Vitamin C serums can sometimes react with DHA and cause strange colors. It's best not to use these products on the same day you apply your self-tanner. Your daily SPF remains essential, as self-tanning does not protect against UV damage, as mentioned earlier.
Natural ingredients and skin health
Modern self-tanning formulas increasingly contain natural ingredients that care for your skin while tanning. Think of aloe vera for hydration, vitamin E as an antioxidant, and green tea extract for a soothing effect. These additions make the difference between simple tanning and actual skincare.
Quality products avoid parabens, sulfates, and artificial fragrances that can irritate your skin. They use natural DHA sources and add nourishing oils like argan oil or jojoba. This results in a product that not only gives a beautiful color but also genuinely improves your skin.
Pay attention to the ingredient list when comparing self-tanning products. The shorter and more natural, the better usually. Products with too many chemical additives can dry out or irritate your skin, especially for sensitive skin types. The frequently asked questions page often provides insight into which ingredients are used.
Suitable for every skin type
Self-tanning works on all skin types, from very pale to dark. However, each skin type requires an adapted concentration. Light skin types should start with lower DHA percentages to achieve a natural result. Darker skin types can use higher concentrations for a noticeable deepening.
Sensitive skin benefits from hypoallergenic formulas without perfume or aggressive ingredients. Always test a small patch on your forearm before treating your entire body. Wait 24 hours to see if any reactions occur. For acne-prone skin, choose non-comedogenic formulas that do not clog pores.
Dry skin needs extra preparation with intensive hydration in the days before self-tanning. Oily skin, on the other hand, can benefit from a lighter formula that absorbs quickly. Combination skin should be treated zone by zone, with adapted products for face and body where necessary.
With the right knowledge and products, self-tanning is an easy way to give yourself a radiant, natural glow. Whether you choose a subtle boost or a deep vacation tan, the key lies in careful preparation, patient application, and consistent maintenance. Tanning Glamour is happy to guide you on this journey to a beautiful, even tan with natural products that become visible within a few hours and remain radiant for up to a week, so you feel well-groomed and confident every day.
Read more
Discover how self-tanning lotion gives you a radiant, even complexion without the sun. Tips for use, results, and a long-lasting glow.
Discover how to use self-tanner for your face for a natural, even complexion. Tips for choosing, applying, and long-lasting enjoyment.