Tanning mitt: for an even, streak-free tan

A radiant, even complexion without streaks or spots? It starts with the right application method. The tanning mitt is the secret behind a professional self-tanning result. Whether you're new to self-tanning or have years of experience, a good applicator mitt makes the difference between a natural glow and unsightly discoloration. In this article, you'll discover why a tanning mitt is indispensable, how to choose the right one, and what techniques ensure you achieve that beautiful, sun-kissed look every time.
Why a tanning mitt is essential
Applying self-tanner with your bare hands may seem simple, but it often leads to disappointing results. Your hands absorb the product, leading to uneven distribution and discoloration of your palms and fingers. A self-tanning mitt prevents these problems and gives you much more control.
Protection against stains
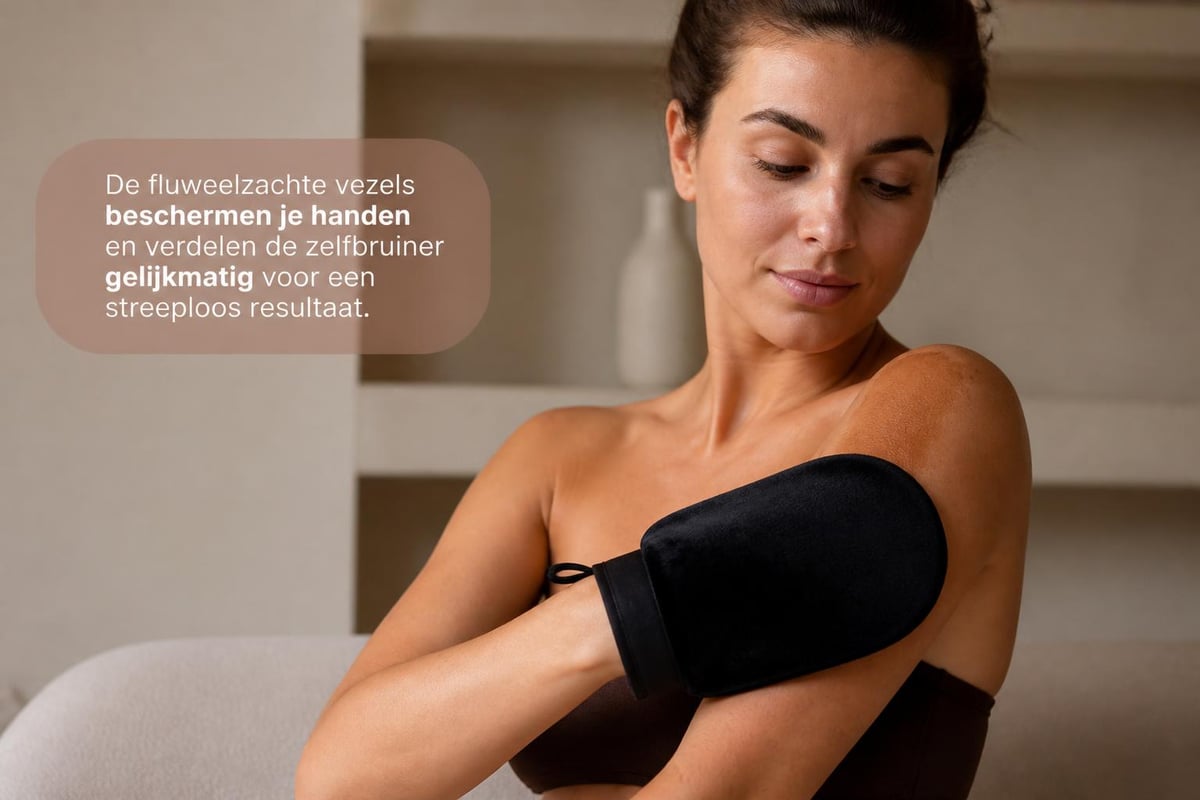
The primary function of a tanning mitt is protection. The material forms a barrier between your skin and the self-tanning product, keeping your hands clean while you work. This is crucial, as discoloration on your palms is immediately noticeable and reveals that you've used artificial tan.
Benefits of a tanning mitt:
- Prevents orange palms and fingertips
- Protects your manicure from discoloration
- Ensures a natural-looking result
- Makes application more hygienic
- Extends the life of your self-tanner through more efficient use
Even distribution for a natural finish
A high-quality tanning mitt has a special texture that distributes the product evenly. Most professional mitts are made of velvet or microfiber material. This soft structure ensures the self-tanner glides smoothly over your skin without leaving spots or streaks.
For example, the Marc Inbane self-tanning mitt emphasizes the importance of a perfected microfiber structure for optimal distribution. This principle applies to all quality applicators: the material's structure determines the final result.
| Application method | Result | Hand discoloration | Professionalism |
|---|---|---|---|
| Bare hands | Uneven | Strong | Low |
| Standard mitt | Fairly even | Minimal | Average |
| Velvet mitt | Very even | None | Professional |
Different types of tanning mitts
Not every tanning mitt is the same. The market offers various options, each with specific features that facilitate certain applications.
Velvet applicators
Velvet mitts are among the most popular choice for self-tanner users. The velvety material feels soft on the skin and creates a luxurious experience during application. The soft texture masks minor imperfections in your application motion, resulting in a more even finish.
These mitts are often double-sided, as mentioned for the St. Tropez tanning mitt, making them extra practical for multiple uses without needing immediate washing.
Microfiber variants
Microfiber mitts have a slightly different structure than velvet models. They are often a bit thinner and more form-fitting, which gives some users more control over application. The material absorbs less product, allowing you to be more economical with your self-tanner.
Characteristics of microfiber mitts:
- Thinner material for more feel
- Quick-drying after use
- Often more affordable than velvet
- Suitable for precision work
- Longer lifespan with proper care
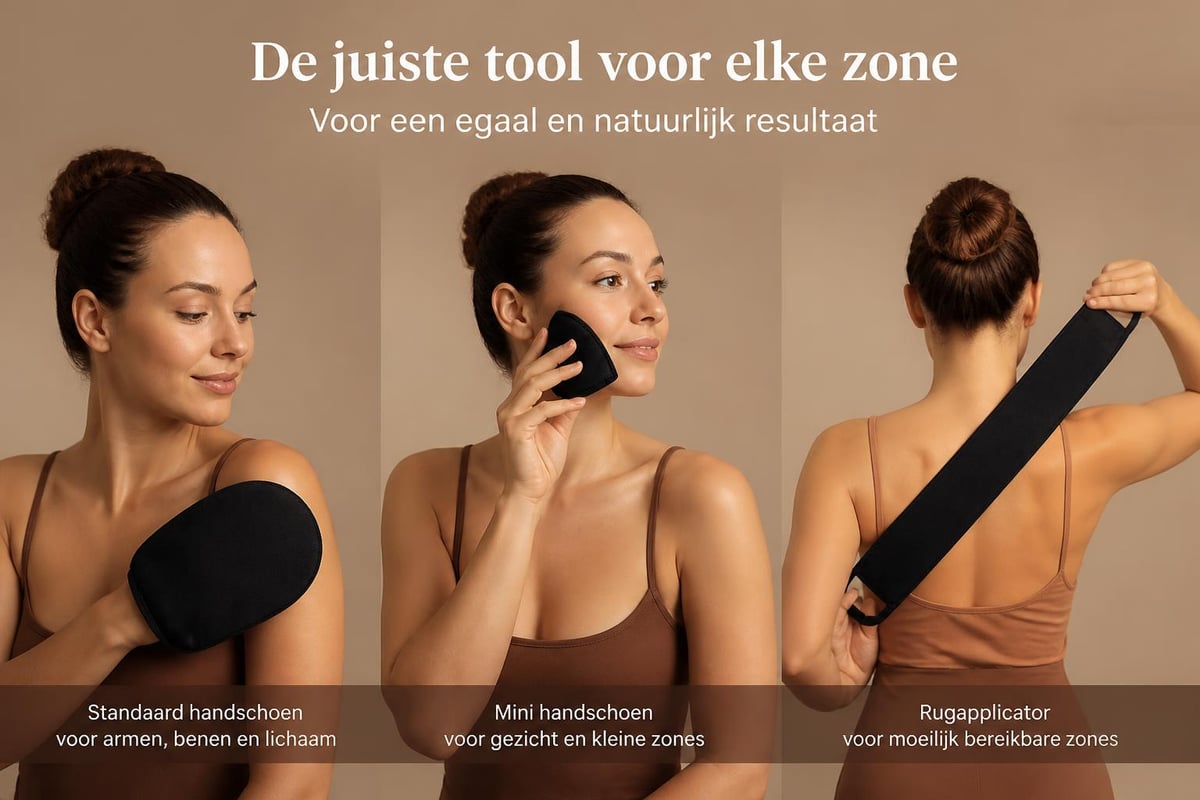
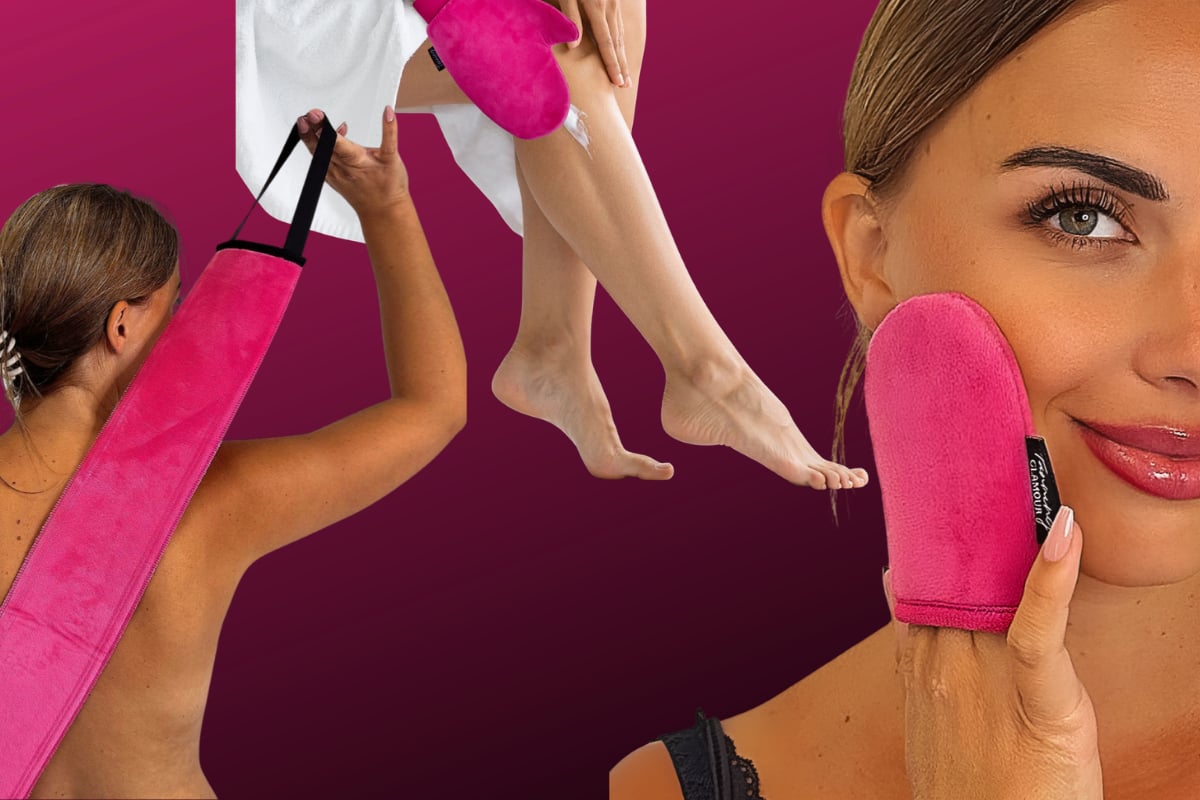
Specialized applicators
In addition to standard mitts, there are specialized tools for hard-to-reach areas. Mini mitts are perfect for your face, while back applicators are specifically designed for self-application to your back. The Tanning Glamour assortment offers complete sets that combine these different tools for a total solution.
Choosing the right tanning mitt
Several factors play a role when selecting a tanning mitt. Your choice influences not only the comfort during application but also the quality of your final result.
Material and texture
The choice of material determines how smoothly the product spreads. Velvet material offers the most luxury and forgiveness for application errors. Microfiber provides more precision but requires a bit more experience. For beginners, velvet is often the best choice because it masks mistakes and gives a more natural result.
Antibacterial coatings are an added benefit of some premium mitts. This treatment inhibits bacterial growth, promoting hygiene and extending the life of your mitt. This aspect is becoming increasingly important as we become more aware of skin health.
Fit and comfort
A well-fitting tanning mitt should fit comfortably around your hand without pinching. Too tight mitts restrict your freedom of movement, while too loose models can slip during application. Most mitts are one-size-fits-all, but check the specifications for an optimal fit.
Checklist for the ideal fit:
- The mitt fits snugly at your wrist without pinching
- Your fingers move freely within the mitt
- The material feels soft and flexible
- The mitt stays in place during circular motions
- You feel sufficient control over the application
Durability and maintenance
A quality tanning mitt will last for months with correct use and maintenance. Look at the stitching and finish: sturdy seams indicate a longer lifespan. Some mitts are machine washable, while others require hand washing. Determine in advance which level of maintenance suits your routine.
The investment value of a good mitt far outweighs the frustrating results of cheap alternatives. A quality tanning mitt pays for itself through consistent results and long-term use.
Professional application techniques
Owning a tanning mitt is one thing, but correct use makes the difference between an average and an excellent result. These techniques help you achieve that natural, sun-kissed glow every time.
Skin preparation
Always start with clean, dry skin. Exfoliate your skin one day before application to remove dead skin cells. This creates an even canvas on which the self-tanner can adhere uniformly. Pay extra attention to rough areas like knees, elbows, and ankles.
Apply a light moisturizer to these dry spots about thirty minutes before you start with the self-tanner. This prevents the product from accumulating in dry areas. For more tips on applying self-tanner, you can consult various sources.
The right movements
Put on the tanning mitt and dispense a small amount of product onto the mitt. Start with your legs and work your way up to your torso. Use circular motions, then finish with long, smooth strokes in the direction of your hair growth.
Step-by-step application method:
- Start with your feet and work upwards per body part
- Apply the product with circular motions
- Blend edges with long, light strokes
- Work quickly but carefully to prevent drying
- Use leftover product for hands, feet, and face
- Allow to dry completely before dressing
The consistency of self-tanners can vary by product. Some lotions are thicker, others more fluid. Just as with hand gels, the rheological properties affect application; similarly, the viscosity of your self-tanner determines how much pressure you need to apply with your mitt.
Special attention to difficult areas
Your face requires a lighter touch than your body. Use minimal product and spread it extra carefully. A mini tanning mitt provides more precision around your nose, eyes, and hairline.
For your back, a specialized back applicator is indispensable. This tool allows for self-application without assistance. The technique differs: move the strap in a sawing motion from left to right while slowly working from top to bottom.
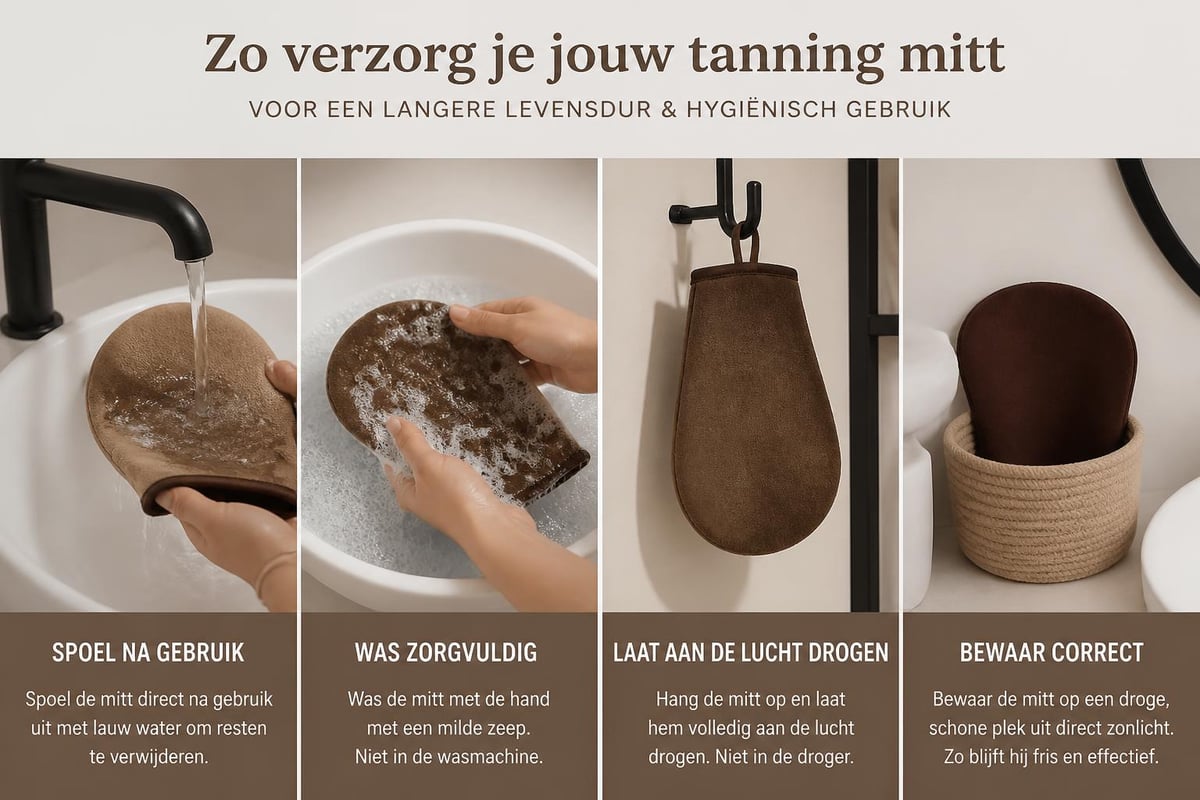
Maintenance and hygiene of your tanning mitt
A clean tanning mitt is crucial for consistent results and skin health. Product buildup reduces the effectiveness of your mitt and can lead to irregular application.
Cleaning methods
Rinse your tanning mitt immediately after use with lukewarm water until the water runs clear. Use mild soap if the product is stubborn, but avoid aggressive detergents that can damage the material. Squeeze gently without wringing, which can deform the structure of the velvet or microfiber.
Most high-quality mitts can be machine washed weekly on a delicate cycle. Use a laundry bag for protection and opt for low temperatures. Always air dry, never tumble dry, to prevent shrinkage and damage.
| Cleaning frequency | Method | Purpose |
|---|---|---|
| Immediately after use | Rinse with water | Remove fresh product residues |
| Weekly | Machine or hand wash | Deep cleaning |
| Monthly | Disinfection | Bacterial control |
Drying time and storage
Hang your tanning mitt in a well-ventilated area to dry completely. Moisture promotes mold and bacterial growth, especially in bathrooms with limited ventilation. A dry mitt retains its soft texture and remains in optimal condition longer.
Storage tips for longer lifespan:
- Store in a dry, clean area
- Avoid direct sunlight that can discolor material
- Do not store in sealed plastic bags
- Allow to dry completely between applications
- Regularly check for wear or damage
Combining with different self-tanners
A tanning mitt works optimally when combined with a self-tanner that suits your skin type and desired result. The interaction between product and applicator determines the final glow.
Lotions and mousses
Most tanning mitts are designed for use with lotions and mousses. These textures spread easily and evenly over the soft structure of the mitt. Mousses are often lighter and dry faster, ideal for beginners getting used to the technique.
Lotions offer more control over intensity and are suitable for those who prefer a gradual buildup. For optimal results with applying self-tanner with a mitt, the right product choice is essential.
Drops and serums
Tanning drops require a different approach. First, mix them with your moisturizer before applying the combination with your mitt. This ensures a more natural, subtle tan that's perfect for daily use. The mitt helps spread this thin formula evenly without streaks.
Spray formulas
For spray self-tanners, it's best to spray them onto your mitt first before spreading them. Direct spraying on the skin without a mitt often leads to unevenness and waste. The mitt catches the product and allows you to apply it exactly where you want it.
Investing in a complete set
For those serious about self-tanning, a complete applicator set is worthwhile. These sets contain various tools for every body part, ensuring an even result everywhere without assistance from others.
A complete application set usually includes a standard tanning mitt for your body, a mini variant for the face and small areas, and a back applicator for hard-to-reach spots. This combination gives you complete control and independence during application.
At Tanning Glamour, you'll find various sets designed for optimal results. The products are developed to work together, from the self-tanner to the applicators, for that natural tan you desire.
Avoiding common mistakes
Even with a good tanning mitt, mistakes can occur. Awareness of these common pitfalls helps you avoid them and ensures consistent, beautiful results.
Using too much product
There's a tendency to use product generously, but this often leads to unevenness and longer drying time. A small amount spreads further than you think. Start conservatively and build up with a second layer if necessary after seeing the initial result.
Symptoms of excessive product:
- Dark spots or streaks
- Sticky sensation that doesn't disappear
- Longer drying time than usual
- Stains on clothing shortly after application
- Uneven discoloration after showering
Incorrect movement direction
Random application movements create irregularities. Consistent, systematic movements in one direction yield the most even result. The direction of your hair growth is a good guide: follow this natural line for the most natural effect.
Insufficient blending at transitions
Transitions between body parts require extra attention. Blend carefully where your torso meets your arms, or your legs meet your body. These areas stand out if the transition is abrupt. Use less product and extra blending motions for seamless transitions.
The future of self-tanner application
Innovations in self-tanner technology also bring new applicator developments. Materials are becoming more refined, with better absorption properties and more durable structures. Some new mitts have integrated indicators that show when replacement is needed.
Sustainability is becoming increasingly important. Manufacturers are experimenting with eco-friendly materials and recyclable options. These developments make it possible to achieve your glow with less environmental impact, aligning with the growing demand for conscious beauty products.
Technology such as treated fibers with minerals or vitamins that care for your skin during application is under development. These innovations transform the tanning mitt from a simple tool into part of your skincare routine.
A tanning mitt is much more than a practical accessory: it's the key to that natural, radiant complexion without streaks or spots. By investing in quality and applying the right techniques, you'll create that sun-kissed feeling you desire every time. Tanning Glamour understands that a beautiful glow starts with the right tools and products. With self-tanners that provide an even tan within hours and last up to a week, combined with professional applicators, you'll get the best out of yourself. Discover today how easy it is to achieve that natural, radiant skin that boosts your confidence.