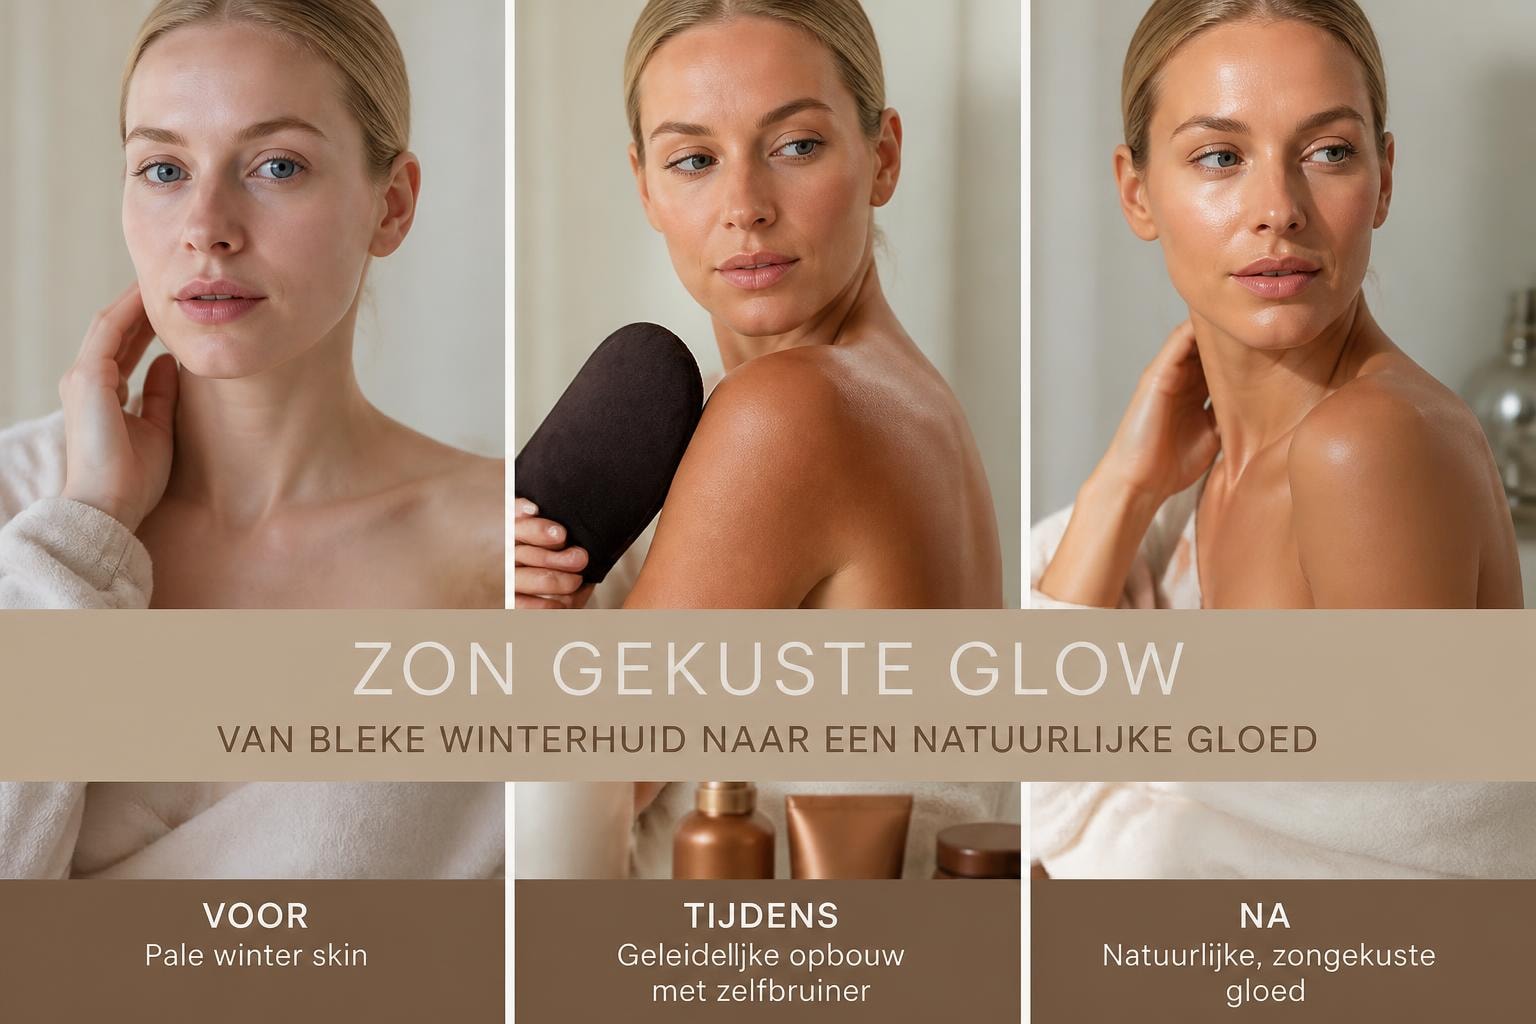
Sun-kissed glow without the sun: tips for radiant skin
For many, radiant, sun-kissed skin is the epitome of a well-groomed appearance. That warm glow instantly makes you feel fresh and confident. However, you no longer need to spend precious vacation days or risk sunbed sessions to achieve that coveted sun-kissed glow. In 2026, the possibilities of safely building a natural tan are better than ever. With the right knowledge, products, and techniques, you can create that golden glow at home, at any time of the year.
Why a sun-kissed glow remains so popular
The allure of sun-kissed skin is universal. It gives a healthy appearance, makes your skin look more even, and enhances your natural contours. Research shows that people with a fair complexion often feel more confident when they have a subtle tan.
The reason partly lies in our perception of health. Sun-kissed skin was historically associated with an active, outdoorsy lifestyle. Although we now know that too much sun exposure is harmful, the aesthetic preference for that warm tone persists.
The risks of traditional tanning
Achieving a tan through natural sunlight or sunbeds carries known risks:
- Skin aging: UV rays break down collagen and elastin, leading to wrinkles and loss of firmness.
- Pigmentation spots: Uneven melanin production causes dark spots that are difficult to remove.
- Increased skin cancer risk: Both UVA and UVB radiation damage DNA in skin cells.
- Dry, irritated skin: Excessive exposure strips moisture and weakens the skin barrier.
This reality has led to enormous growth in the self-tanning industry. Modern formulas offer a safe alternative that delivers the same aesthetic benefits without the dangers.

The science behind the perfect glow
Modern self-tanners work through an active ingredient called dihydroxyacetone (DHA). This sugar compound reacts with amino acids in the outermost layer of your skin, producing a brownish color. The process is entirely superficial and safe.
The quality of your sun-kissed glow depends on several factors. The DHA concentration determines the intensity, while auxiliary substances like erythrulose provide a more natural undertone. High-quality formulas also contain nourishing ingredients that hydrate the skin during the tanning process.
Timeline of development
Understanding when to expect results helps in planning your applications:
| Time | What happens | What you see |
|---|---|---|
| 0-2 hours | DHA binds with amino acids | Slight discoloration begins |
| 2-4 hours | Tanning process accelerates | Clear tan visible |
| 4-8 hours | Maximum color development | Full sun-kissed glow achieved |
| 5-7 days | Gradual fading due to natural cell renewal | Even fading |
Skin preparation for optimal results
The foundation for a beautiful, even sun-kissed glow begins before you even apply a product. Your skin must be smooth, clean, and well-hydrated to absorb the self-tanner evenly.
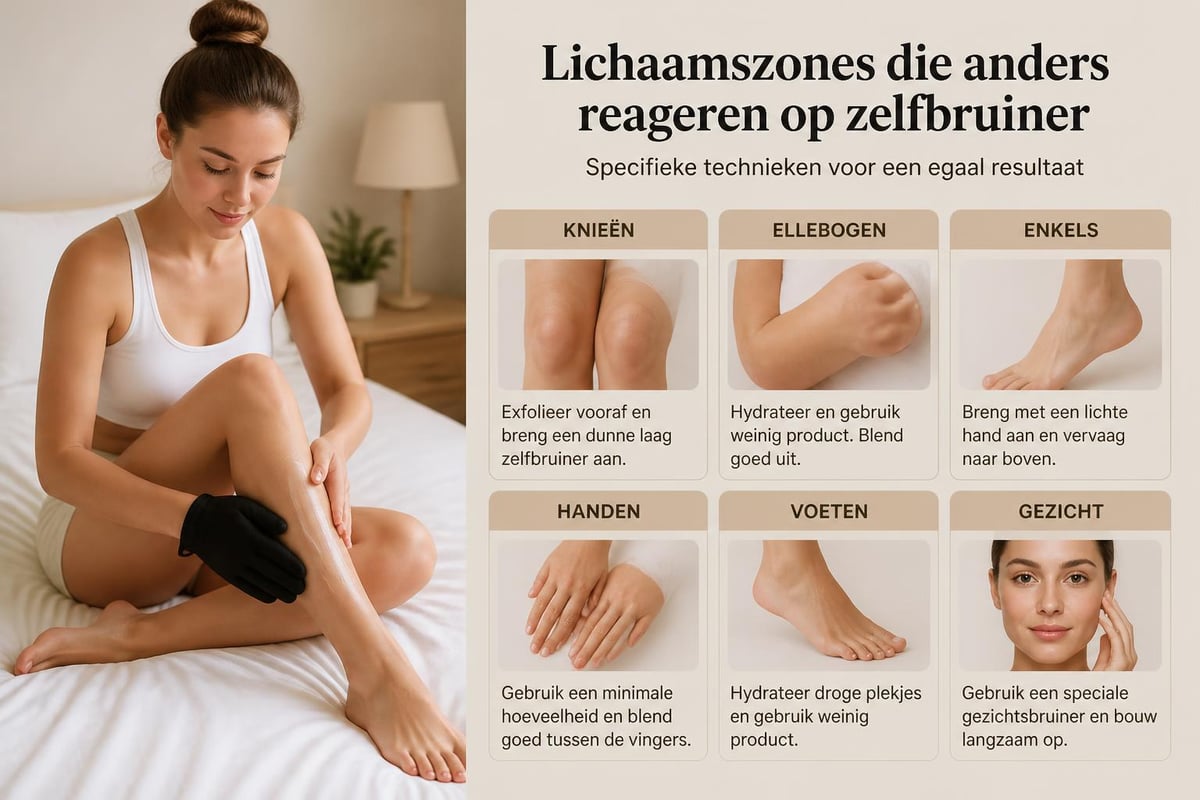
Start with thorough exfoliation, at least 24 hours before application. Focus especially on rough areas such as knees, elbows, ankles, and feet. These areas have more dead skin cells that can absorb extra self-tanner, leading to dark spots.
Preparation checklist
- Shave or epilate at least 24 hours in advance to avoid irritation
- Exfoliate your entire body with a scrub or mitt
- Shower to remove all product residues
- Pat your skin dry and wait 15-20 minutes for complete drying
- Do not apply body lotion, deodorant, or perfume just before application
- Keep towels and mitts ready for immediate protection
Application techniques for a streak-free result
The way you apply your self-tanner largely determines how natural your sun-kissed glow looks. Professionals use specific techniques that you can easily replicate at home.
Always start with a small amount of product. You can always apply a second layer, but removing excess product is much more difficult. Work in sections and use circular motions to distribute the product evenly.
For your face: less is more. Certain self-tanner tips emphasize the importance of careful application around hairlines, eyebrows, and the neck.
Order of application
- Start with your legs and work your way up to your torso
- Do your arms second, ending with hands and wrists
- Apply carefully to your face and neck
- Treat hard-to-reach areas like your back last
- Dilute excess product on knees, elbows, and ankles with a damp cloth
- Use minimal product on hands and feet
For a professional, streak-free result without staining your hands, the right applicator tool is essential. Modern application materials help you distribute the product evenly and prevent discoloration of your palms.

Choosing the ideal self-tanner for your skin type
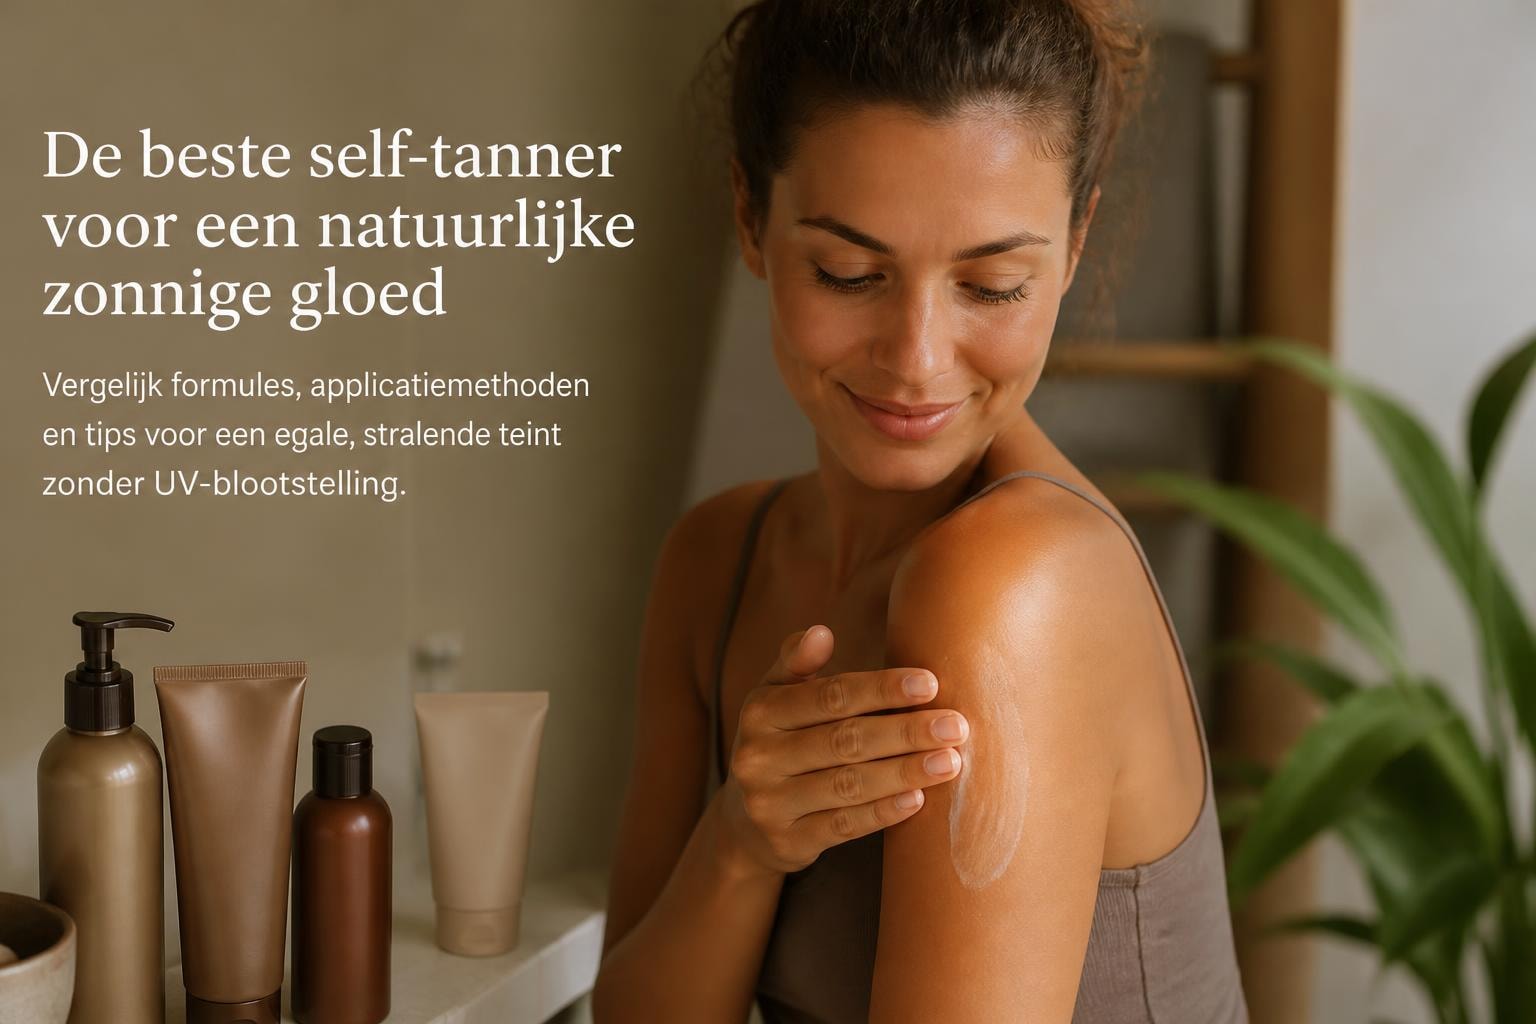
Not all self-tanners are created equal. Your skin type, desired intensity, and lifestyle determine which product is best for you. The market offers various formulations, each with specific benefits.
Lotions are the most popular choice for the entire body. They offer medium to high coverage and are easy to distribute. The correct use of a self-tanner requires attention to the right amount per body part.
Drops provide ultimate control over intensity. You mix them with your daily moisturizer and gradually build up a tan. Perfect for beginners or those who prefer a subtle sun-kissed glow.
Comparison of formulations
| Type | Development Time | Intensity | Best for |
|---|---|---|---|
| Lotion | 2-4 hours | Medium-High | Full body coverage |
| Drops | 4-6 hours | Adjustable | Face and gradual build-up |
| Mousse | 1-3 hours | High | Fast results |
| Spray | 2-4 hours | Medium | Large areas, back |
Maintaining your sun-kissed look
Achieving a beautiful sun-kissed glow is one thing; maintaining it is another. The average self-tan lasts 5-7 days, but with proper care, you can extend this and keep it even.
Hydration is absolutely key. Dry skin renews faster, meaning your tan will fade unevenly. Apply a rich body lotion daily, especially after showering. Tips for extending your tan emphasize the importance of consistent moisturization.
Avoid long, hot showers that dry out your skin. Use lukewarm water and gentle, sulfate-free cleansers. Pat your skin dry instead of rubbing, which can damage the top layer and cause your tan to fade faster.
Daily care routine
Morning:
- Shower briefly with lukewarm water
- Use a mild, hydrating body wash
- Gently pat skin dry
- Apply body lotion to damp skin within 3 minutes
Evening:
- Cleanse face with a gentle cleanser
- Apply a rich night cream
- Consider extra hydration for very dry areas
- Change sheets regularly to prevent product build-up
Avoiding common mistakes
Even with the best products, things can go wrong. Knowledge of typical pitfalls helps you create a flawless sun-kissed glow. The most common mistake is rushing. Many people apply too much product or get dressed immediately after application.
Timing is crucial. Wait at least 10-15 minutes before putting on clothes. For optimal results, you can even take 30 minutes. Choose loose, dark, breathable clothing for the first few hours after application.
Another common mistake is neglecting edges. Your hairlines, behind your ears, your neck, and the transition to your hands require extra attention. Creating a natural no-makeup look requires perfect blending in these transition zones.
Troubleshooting
Streaks or spots:
- Gently exfoliate the affected area
- Apply lemon or lime juice with a cotton pad
- Use a special correction product
- Reapply self-tanner for evenness
Orange undertone:
- Choose products with erythrulose in addition to DHA
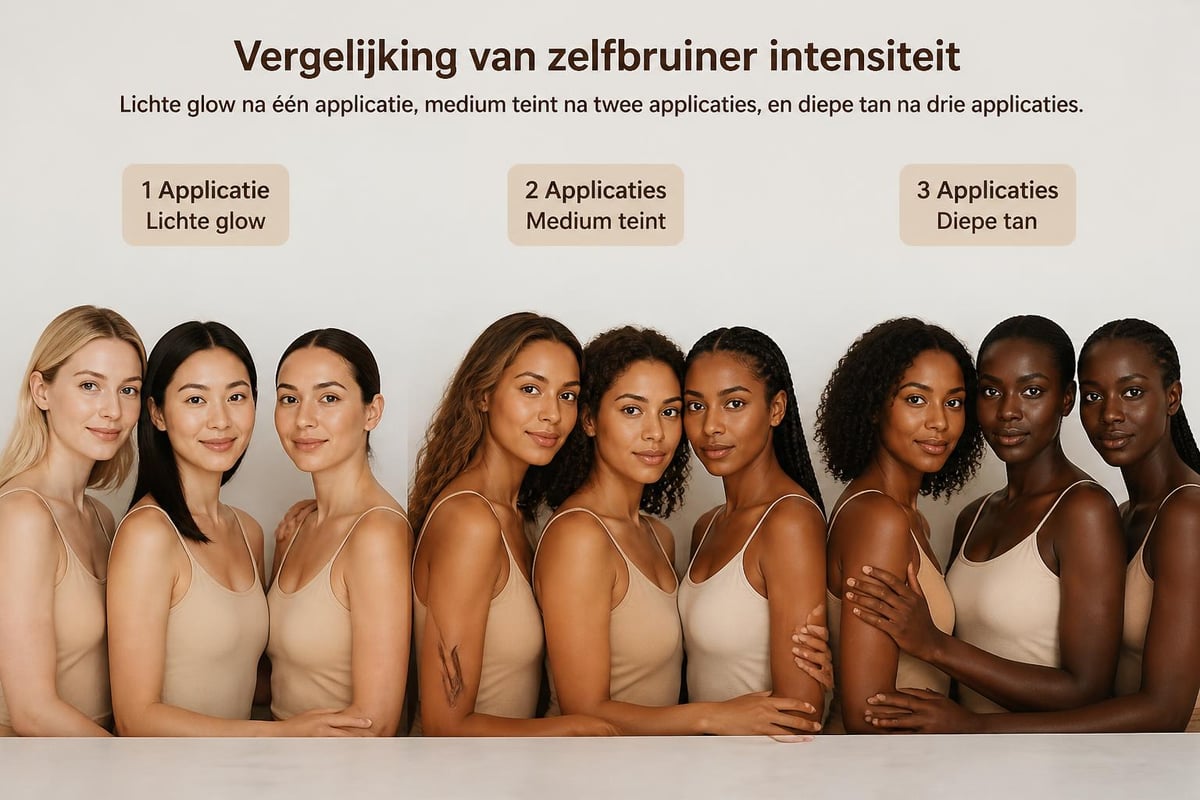
- Gradually build your tan with multiple thin layers
- Avoid products with too high DHA concentrations for your skin type
- Always test on a small area first
Too dark result:
- Exfoliate regularly to speed up the fading process
- Take a daily bath with baking soda
- Use body lotion generously to stimulate cell renewal
- Wait at least 48 hours before a new application
Seasonal adjustments
Your approach to your sun-kissed glow may vary by season. In winter, when your skin is naturally lighter, start with a lower intensity. During spring and summer months, you can increase the intensity for a more natural look that matches increased outdoor activities.
Winter also requires extra hydration. Central heating and cold outdoor air dry out your skin, affecting the longevity of your tan. Invest in a humidifier and use richer moisturizers than in warmer months.
Annual planning for optimal results
Winter (December-February):
- Start with subtle intensity
- Focus on face and décolleté for a fresh look
- Apply twice a week for a light glow
- Use extra hydrating formulas
Spring (March-May):
- Gradually build intensity
- Extend to arms and legs
- Increase frequency to 3 times a week
- Combine with natural light sun exposure (with SPF!)
Summer (June-August):
- Maintain your tan with regular touch-ups
- Focus on evenness in visible areas
- Coordinate with holiday plans
- Pay extra attention to water-resistant formulas when swimming
Autumn (September-November):
- Gradually decrease intensity
- Prepare skin for winter dryness with intensive hydration
- Exfoliate more often for fresh cell renewal
- Evaluate which products worked best
Combining with other beauty products
A sun-kissed glow does not stand alone in your beauty routine. Combining it with the right products enhances the effect and creates an integrated, natural look. How to get perfectly tanned skin often includes makeup and skincare advice.
For your face, you can mix your self-tanner with your serum or day cream. This gives a more subtle build-up and prevents your face from becoming darker than your body. Make sure all products you combine work well together and do not contain ingredients that interfere with the tanning reaction.
Makeup can enhance your glow. Bronzer on your cheekbones, temples, and jawline accentuates natural contours. Choose shades that match your new tan. A warm blush and golden highlighter perfectly complement a sun-kissed glow.
Product compatibility
Safe to combine:
- Hyaluronic acid serums
- Vitamin E lotions
- Glycerin-based moisturizers
- Aloe vera gels
Avoid directly before/after application:
- Strong exfoliating acids (AHA/BHA)
- Retinol products
- Benzoyl peroxide
- High-concentration Vitamin C serums
The psychological impact of a radiant complexion
The benefits of a sun-kissed glow extend beyond pure aesthetics. Research shows that people with sun-kissed skin feel more attractive and confident. This psychological boost has measurable effects on social interactions and general well-being.
Safely achieving a sun-kissed glow is increasingly recognized as a form of self-care. The ritual of application, control over your appearance, and the visible result provide a sense of empowerment.
For many, their skincare routine is a moment of peace and self-attention. Adding self-tanner to this routine strengthens this feeling. You actively take time to do something good for yourself, which contributes to your mental balance.
Self-confidence in different contexts
- Professional environment: A well-groomed appearance radiates professionalism and attention to detail
- Social events: Confidence in your appearance makes you more relaxed and present
- Relationships: Positive self-perception improves how you present yourself and connect
- Photography: An even complexion photographs better and reduces needed lighting corrections
Trends and innovations in 2026
The self-tanning industry is constantly evolving. In 2026, we see a shift towards more natural ingredients and eco-friendly packaging. Brands are investing in formulas that not only tan but also possess active skincare properties.
Personalization is becoming increasingly important. Consumers expect products specifically tailored to their skin type, desired intensity, and lifestyle. Technology plays a role here, with apps that help you determine the perfect formula and application schedule.
Ingredient transparency is no longer optional. Customers want to know exactly what they are putting on their skin. This has led to cleaner formulas without parabens, sulfates, and synthetic fragrances.
Future developments
Expected innovations:
- AI-driven color matching for a perfect tan for every skin type
- Probiotic-enriched formulas for skin barrier support
- Long-lasting formulas that last 10-14 days
- Climate-neutral production and biodegradable packaging
Sustainability focus:
- Refillable packaging will become standard
- Waterless formulas reduce transport weight
- Local production reduces carbon footprint
- Ethical sourcing of all ingredients
Special attention to face and décolleté
Your face requires a different approach than your body. The skin is more sensitive, thinner, and constantly visible. A natural sun-kissed glow on your face starts with a lighter formula or diluted version of your body self-tanner.
Self-tanners for a natural look often advise starting with drops mixed with your day cream. This gives you control and prevents your face from becoming too dark compared to your body.
Pay extra attention to your hairlines. Remove excess product with a damp microfiber cloth. Your eyebrows can absorb product, which looks unnatural. Always wipe along your eyebrows with a clean cloth after application.
Face application step-by-step
- Cleanse your face thoroughly and pat dry
- Apply a light moisturizer to very dry areas (around the nose, corners of the mouth)
- Mix your self-tanner with day cream for the first application
- Apply with clean hands or a brush in upward movements
- Start at your forehead and work downwards
- Blend carefully at hairlines, jawlines, and neck
- Remove product from eyebrows
- Wash hands immediately after application
From product choice to perfect routine
Creating your ideal sun-kissed glow is a personal journey. What works for one person may not be perfect for another. Experimenting with different products and techniques helps you discover what suits you best. The process begins with getting to know your own skin and what it needs.
Investing in quality products pays off in the long run. Cheaper alternatives can give disappointing results with orange undertones or uneven discoloration. Professional formulas are developed with years of research and offer consistent, natural results.
More information about natural brown complexion without sun damage helps you understand why modern self-tanners are the best choice for your skin and your confidence.
Roadmap to success
Week 1-2: Preparation and test
- Exfoliate your skin daily
- Invest in the right tools
- Test product on a small area
- Determine your ideal intensity
Weeks 3-4: First applications
- Start with low intensity
- Focus on technique and evenness
- Document results and lessons learned
- Adjust timing based on results
Week 5+: Optimization and routine
- Increase intensity if desired
- Develop a fixed application schedule
- Integrate maintenance into daily routine
- Enjoy your consistent sun-kissed glow
A radiant, natural sun-kissed glow is within reach for anyone willing to invest in the right products and techniques. With modern self-tanners, you can safely create that coveted warm complexion without the risks of UV radiation. Tanning Glamour offers natural formulas that deliver an even, long-lasting tan within a few hours, beautiful for up to a week, so you can radiate confidence and a healthy glow every day.
Read more
Discover the best self-tanning methods for a natural glow in 2026. Safe, even, and without streaks or orange undertones. Tips & products.
Discover how to safely get a tan with self-tanning sunscreen. Learn the difference and get tips for a healthy, golden glow in 2026.